Showing posts with label Birthdays. Show all posts

Monday, July 1, 2013

Monster Truck Birthday Party Part 4 - DIY Monster Truck Race Track


For the whole Monster Truck experience, please review Parts 1-3 for ideas. This was my favorite part because it is an original idea. I was brainstorming with my scrap ladies one Friday night on what materials I could use to create the track but keep it safe for kids. I am a HUGE fan of the dollar stores and knew I wanted to use the pool noodles in some way. My girlfriend Laura came up with the brilliant idea to use yard sticks. Here is how we did it.

1. Use landscape chalk to mark out your track.
2. Measure your checkered flags and hammer in yardsticks with a rubber mallot. We hammered them in approximately 6 inches deep and just eyeballed the distance between the noodles.
3. Cut slits with a box cutter along the side of the noodle so you can slide it around the yardstick.
4. Attach your race flags from noodle to noodle and complete the track. I cut out the words Finish for the final flags at the end.

Another, prop that was a HUGE hit with the kids was the case (36) of Tire Swim tubes that I bought at the Dollar Tree. We blew them up and stacked them. The kids had a blast stacking and knocking them down. 


The greatest part was....the guests were able to take their Grave Digger trucks, tire tubes and noodles home after the party. Who needs 20 pool noodles and 36 tubes???

You don't even have to wait for a birthday. This is fun to do as a summer activity. 

Special thanks to my parents and brother who helped execute on the crazy Monster Truck track. You know you love me and my crazy ideas!!!!


Let's start planning next year.......
~Jenn

Linked up to these blog parties:

BWS tips buttonSumo's Sweet Stuff
Skip To My Lou


Tuesday, June 25, 2013

Recycled Acrylic Frame Album

Okay if you have been following our blog, you are somewhat aware we are big on finding new life for old items. Also we are thrift store junkies.
 With that said, finding so many of these little acrylic frames for just pennies, seemed destined to be turned into something, an album of course.


This can be done with single frames or double frames. It's great to make calendars or albums,
just so many options for these free standing little treasures.


The number of pages are your choice, I just used the key rings at the top with holes punched in the card stock and let my imagination run.


I added little pockets, frames, library cards. It's just the perfect project that will become addictive and so good for using your little odds and ends. 
Of course I am always a fan of any many embellishments. 
The more the merrier. Have fun.

~Cathy

Linked up to these blogs.

Today's Creative BlogCrafty Confessions

Monday, June 24, 2013

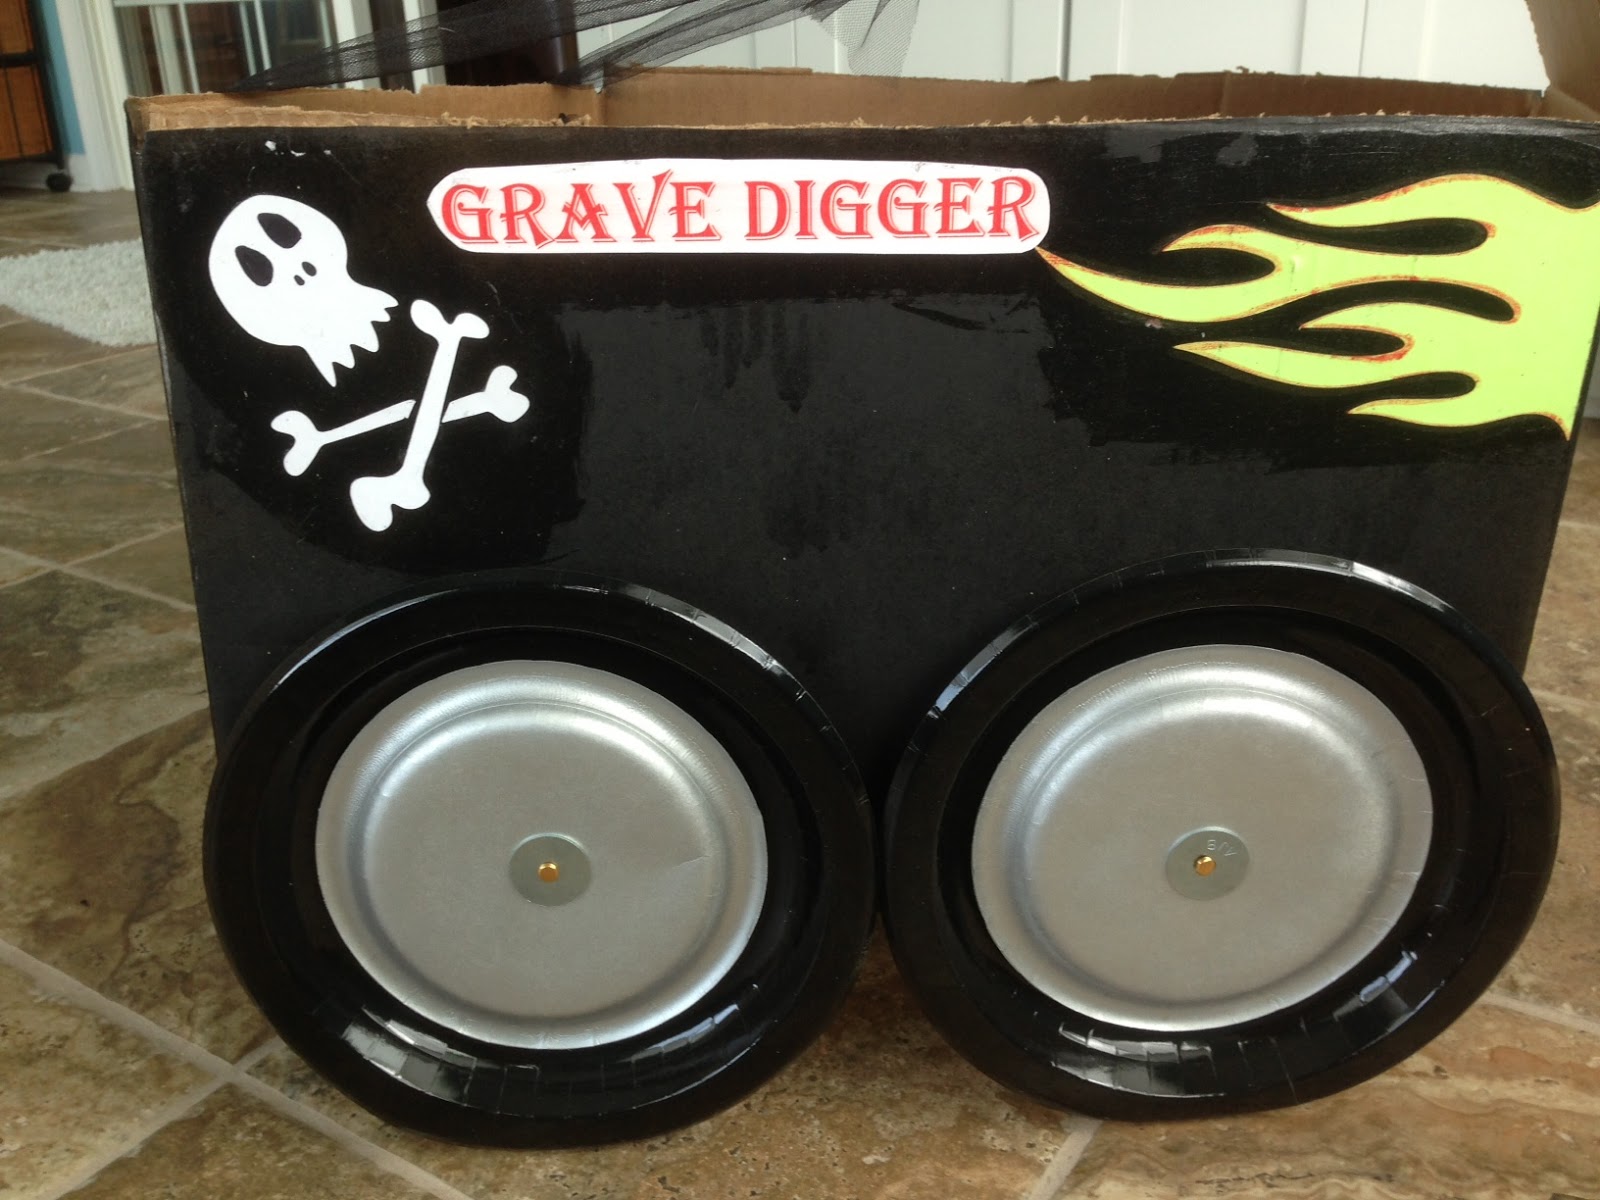
Monster Truck Party Part 3 - DIY Monster Truck Costumes

So the main part of the party was going to be the Monster trucks for each child and the obstacle course for them to run through. With 15 children invited, I had to start early in order to have enough time to make all the trucks!!! Thankfully my friday night girls and Cathy were up for the challenge!

I saw some Box cars on Pinterest so I got my inspiration from Pinterest searches. You can visit my 'Birthday Love' Pinterest board for links to all the ideas > HERE.

I completely deviated from all the ones I saw but leveraged the overall idea!

Materials used: 

  • Boxes (varying sizes for the kids young and old)
  • Box cutter
  • Modge Podge
  • Plates (2 different sizes for the wheels)
  • Black, Red and Silver Spray Paint
  • Cricut and Cricut Stencil Cartridge (for flames and skulls) 
  • Paper (to cut out the flames, skulls, and print Grave Digger on the side)
  • Coasters (Spray painted Red and attached as headlights)
  • Hot Wheels License Plates (from The Dollar Tree - 2 in a pack for $1)
  • Washers 3/16" x 1-1/4"(optional for bling on tires)
  • Fasteners - 1-1/2" (to secure the tires - bought at OfficeMax)

Ok this took many Friday nights and Saturdays. Here was our spray painting party one chilly Saturday!


  1. Cut flaps off boxes except for the windshield.
  2. Spray paint all parts - Boxes, wheels, and headlights. 4 wheels per box x 2 plates each wheel = 128 plates spray painted!!! Whew! 
  3. Cut out enough flames and skulls for all trucks. I used 3 flames on front, 1 on each side and 2 on the back = 7 flames per truck!
  4. Print out Monster Truck logo - ours was Grave Digger. 
  5. Mod Podge all paper embellishments to truck. 
  6. Secure wheels (in assembly order Large plate, small plate, washer, fastener)
  7. Attach Tulle for the suspender like attachment for each child. You will need a child to help you gauge this. They are going to be tighter that you would guess!
OK, in 7 steps this looks like it was easy! If you are attempting to replicate, please feel free to email me at outonalimbinva@aol.com if you have questions! Here is the Grave Digger original and our final product. 


Not too shabby if we do say so ourselves!!!
~ Jenn

Linked up to these blog parties:

BWS tips buttonSumo's Sweet Stuff
Skip To My Lou


Saturday, June 22, 2013

Monster Truck Party - Part 2

So, I had the invitations covered...now onto the fun stuff! If you are just joining us see previous post HERE.
Here is today's party list To Do:
  • Balloon Wreath
  • Pin the License Plate on the Monster Truck


I ran across Pin the License Plate on the Monster Truck on Pinterest....


I loved that I could personalize the license plates for each kid and you can pick your state! Too bad Virgina has a very BORING license plate!

You can purchase the digital files HERE. Then I sent the poster to Sam's Club and got a 16x20 poster for $5! The license plates I printed out on cardstock.

I can't tell you how much I loved this. I will totally use this again!!!

Let's be real, it was a great photo op for capturing party attendees!

One warning on personalizing items, ok two. 1) Make sure you have the correct spelling of each child's name and 2) be prepared for last minute additions. As you will see, I had a lot of personalization so ensuring that no child was left behind was important. Even if a child was too young for the activity, I printed the license plate anyway. The visual was just as important and feeling of inclusion were important.

Though I am covering this early in the Monster Truck story, this was actually a last minute addition. As if I didn't have enough on my plate! This took me a Friday Craft night with my girls and it was a long night. I would say 4 hours to put this bad boy together. Not to mention my thumbs were raw from the floral stick pins! Now you know I love my son, because I do not have the patience for a project that long!


I didn't take pics of the process, but the pin that inspired me has a great tutorial. You can view it by clicking HERE and visiting the blog Cupcake Diaries. Good luck!

Next Monster Truck Party post:

  • Monster Trucks - for each child built out of boxes
You won't want to miss this one! Check back!!!!
~ Jenn

Thursday, June 20, 2013

Monster Truck Birthday Party - Part 1

So this year as I was planning my son's 4th birthday party, I looked at the options. Chucky Cheese, Bounce Houses, local farms, aquariums, etc. We had done a zoo party last year and that was a great value for our money. If I am having someone host, then I am paying them to take care of everything so I don't have to stress.

Problem is most of the places I was looking at didn't meet this criteria. So, I cruised Pinterest. I looked at birthday themes and finally landed on a Monster Truck Party! My son loves Grave Digger and each summer we visit Digger Dungeon on our way down to the Outer Banks, NC so this was perfect!

To see the birthday ideas that I gathered from all over, follow my Birthday Love Pinterest board.

Luckily, I was starting to think about this wayyyyyy in advance. So I had time, resources and friends to help me brainstorm and implement. I got together with Cathy and showed her all my ideas and she added to the momentum. We were even talking about buying a monster truck and starting our own monster truck traveling to boys birthdays as a business. Wouldn't that be cool if a Monster Truck parked on the lawn and we could take pics of all the kids in it? See what happens when we get together????!!!
Here was my party list:
  • Invites
  • Lanyards
  • Balloon Wreath
  • Pin the License Plate on the Monster Truck
  • Monster Trucks - for each child built out of boxes
  • Monster Truck Obstacle Course
  • Wall O Tires
  • Favor Bags
  • Monster Truck cake
  • Pizza - LOL I needed something to be easy!!!!
Through a series of posts I will share each of these and the overall final results. I will share where I ordered items and how I made the things I made. Be sure to check back!

So the first thing was the invites. Etsy has so many Monster Truck options for invites and they were all so cool I had a hard time making up my mind. I finally settled on these......
Note: I blurred out our address information at the bottom.  No stalkers please!
You can purchase them from CustomGraphics4u on Etsy - HERE. There are so many themes to choose from. I will definitely be ordering from her again! She sends you the file and you print the invites on 4x6 photo paper. There are always 10 cents deals at Walgreens. Two are on a sheet so that is 5 cents and invite! 

I also ordered lanyards on Etsy from thatpartygirl - HERE. They were slightly more expensive 12 for $30 but I figured that by the time I bought the lanyards and printed the pic it would have saved me time and headache, so I splurged. My original intent was to give these as the invite; however, I wanted the kids to wear them to the party. Let's be real: When going to a birthday party we are lucky enough to grab the present, let alone the invite! So I decided to give the tickets and save the lanyards for entry. That worked great!


Welcome to my world of trying to capture moments with a 4 year old! Stay still and don't say cheese!
Note: You know the drill! Yes blurred out personal info :)

This was definitely the start of something good! Invites {check}, lanyards {check} - next up...Balloon Monster Truck Wreath and Pin the Licenses Plate on the Monster Truck! Stay tuned!
~Jenn

Monday, June 3, 2013

Birthday Cake with Gifts In Each Slice!

I made this three level birthday cake out of card stock paper and birthday party decorations for my two year old grandson's racing theme birthday.


Each level has a special little gift tucked inside the paper slices.

  • The bottom level slices have a little monster truck hidden inside each of the 6 slices.
  • The middle layer of cake slices each holds a hot wheel car. 
  • The top layer each one has a little candy treat inside.


All of the other embellishments basically came from the Dollar Tree including the red base which is just a plastic serving bowl turned upside down. The top is also just racing birthday party decorations with spray painted chipboard letters. I also added two monster trucks on top and as you can imagine the little guy was thrilled!!  


I also made this same cake idea for my daughters 25th birthday in lavender and pink flowers but just one large round layer. Each slice had its own little jewelry gift inside. It was also a big hit and so fun to make.

Thanks for looking!

~Cathy