Showing posts with label spray paint. Show all posts

Tuesday, July 16, 2013

Kitchen Ledges- Awkward or Opportunity?

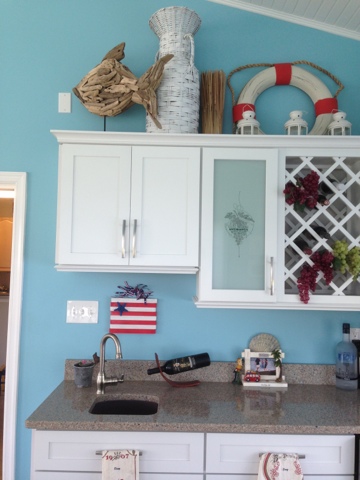
I have a love hate relationship with my kitchen ledges. I have never known how to decorate them and so I searched Pinterest with little to no luck. My goal was to use what I had on hand to create a visually appealing display. I did pick up a few pieces at the thrift store - cheater!

My parents are from Iowa and I love having the pottery around the house that reminds me of summers in Iowa. I had everything on hand here but the R. I think that was $5 at Tuesday Morning. 
I had all of these items on hand except for the wreath. I bought this for $1 at the thrift store. Though it wasn't perfect, you really can't tell from a distance.
The plate I picked up at the thrift store. I spray painted the Simple sign with Lagoon from Rust-o-leum. The lemons are actually a dishtowel that I purchased from Crate and Barrel for $5 and framed. Instant art! I didn't have pretty dishtowels on hand :(
The plate was another thrift store find. The apothecary jars with the tomatoes and limes in them are $1 store purchases glued together to make the jars. They are candlesticks and vases = $4 for 2 sets SCORE! 

The stool I spray painted lagoon so I had some consistency throughout the stories. Same idea with using the glass insulators in turquoise throughout the groupings to connect them. 


I have to admit that I had a hard time having open space but I love how it turned out! What ideas do you have?

~Jenn
Linked up to this party:

Thursday, July 11, 2013

Little Garden Shed Makeover

When we first bought our home 12 years ago, this little shed was sitting out back. We've always used it to store garden supplies and it did the job. One day recently, I looked at it and thought it needed a new look.

So I started out with painting the trim a soft Caribbean blue and found great pieces of metal wall hangings that would weather well.
I also painted the front door a nice bright red and even the cheap piece of plastic fence got a facelift to match the trim.
What was a dingy shed is now a bright welcoming spot in my backyard! I have to say I LOVE the view now!
~Cathy

Sunday, July 7, 2013

Beach American Flag Decor

My Dad is always fostering creativity in Kyle, as he did to me as a child and look how I ended up! So he brought a bucket of scrap wood for Kyle to play with and build things.


My son has a very good imagination and as soon as he started playing with them, he wanted to make an airplane. So paint and Batman duct tape transformed this plain wood to the Batplane! (And made Mommy a superhero!)

So the challenge was on! What could I create?? Lately, I have been so inspired by the 4th of July projects on Pinterest. I saw one similar to my version on Pinterest but I can't find it now:( Sorry I like to give credit for the inspiration but it is lost in Pinterest land.

I knew I had all the supplies on hand already so I had to get started! 

Supplies: Wood scraps, spray paint, shell, screws, wire hanger and ribbon. 


I did add some Flag ribbons that I scored at Michael's for 75% off. I think this goes perfectly in our beach themed sunroom. What do you think? 


You simply can't go wrong with American decor. Hope you all enjoyed the holiday and weekend! 
~Jenn

Linked up to these Blog parties...


Monday, June 24, 2013

Monster Truck Party Part 3 - DIY Monster Truck Costumes

So the main part of the party was going to be the Monster trucks for each child and the obstacle course for them to run through. With 15 children invited, I had to start early in order to have enough time to make all the trucks!!! Thankfully my friday night girls and Cathy were up for the challenge!

I saw some Box cars on Pinterest so I got my inspiration from Pinterest searches. You can visit my 'Birthday Love' Pinterest board for links to all the ideas > HERE.

I completely deviated from all the ones I saw but leveraged the overall idea!

Materials used: 

  • Boxes (varying sizes for the kids young and old)
  • Box cutter
  • Modge Podge
  • Plates (2 different sizes for the wheels)
  • Black, Red and Silver Spray Paint
  • Cricut and Cricut Stencil Cartridge (for flames and skulls) 
  • Paper (to cut out the flames, skulls, and print Grave Digger on the side)
  • Coasters (Spray painted Red and attached as headlights)
  • Hot Wheels License Plates (from The Dollar Tree - 2 in a pack for $1)
  • Washers 3/16" x 1-1/4"(optional for bling on tires)
  • Fasteners - 1-1/2" (to secure the tires - bought at OfficeMax)

Ok this took many Friday nights and Saturdays. Here was our spray painting party one chilly Saturday!


  1. Cut flaps off boxes except for the windshield.
  2. Spray paint all parts - Boxes, wheels, and headlights. 4 wheels per box x 2 plates each wheel = 128 plates spray painted!!! Whew! 
  3. Cut out enough flames and skulls for all trucks. I used 3 flames on front, 1 on each side and 2 on the back = 7 flames per truck!
  4. Print out Monster Truck logo - ours was Grave Digger. 
  5. Mod Podge all paper embellishments to truck. 
  6. Secure wheels (in assembly order Large plate, small plate, washer, fastener)
  7. Attach Tulle for the suspender like attachment for each child. You will need a child to help you gauge this. They are going to be tighter that you would guess!
OK, in 7 steps this looks like it was easy! If you are attempting to replicate, please feel free to email me at outonalimbinva@aol.com if you have questions! Here is the Grave Digger original and our final product. 


Not too shabby if we do say so ourselves!!!
~ Jenn

Linked up to these blog parties:

BWS tips buttonSumo's Sweet Stuff
Skip To My Lou


Sunday, June 23, 2013

Summer Fun Garden


On a beautiful Sunday afternoon it just makes me want to be outside hanging wind-chimes,  painting flowerpots and looking to see what whimsical object I can stick in my flower bed.


I really enjoy going to thrift stores and looking for those fun little objects that can have a new life tucked in the flowerbed somewhere. Both the chair and bird (repainted blue bird of course) came for just a few dollars from my favorite up cycle store.


Just  look around and find items that can be painted like these old lawn chairs I placed up in a plain corner of my yard. That is not really a ladder with the hanging pots, 
it's the back of a very old bench


I especially love looking for little toys to place around the yard, sometimes I just have a hard time keeping the grandsons from pulling them out!


Just look for anything that makes you happy, doesn't always have to be a green thumb. Happy Sunday!

~Cathy

Featured on these blogs - check them out! 


Friday, June 14, 2013

Time to Upcycle Again...


My best friend  gave me this little picnic table that her sweet boy had outgrown. 


So I brought it home and of course I had to have help from my grandson and we began to disassembled the entire table.


Then spray painted each piece.


Then  " we"  had to reassemble it.


 I also added his little hand prints on top. He is going to have a new little brother in September so next summer it will be time to add the new little hand prints on the other side. I just used the children's washable paint and then sealed with Mod Podge.


Always look at a discard through spray painted eyes!

~Cathy


Saturday, June 8, 2013

Thrift Store Find: Art Desk Revamp

Cathy and I love going to the thrift store because you never know what little treasures you will find. One particular day, Cathy and I went into the thrift store and it was unusually busy. So, we deviated from our normal route and went to the part of the store that we never find bargains. As soon as we start out, I see this dirty nasty art desk by Step 2. It had been outside and neglected and I couldn't tell if it had crayons, sticks or cigarette butts in the pencil holder -- ewwwww! The kicker was the price tag was $4.98!!!!! Ok these things never happen to me. I felt like I won the lotto.

I did look up a new one online and they seem to be around $75 -- SCORE!
Recently my kitchen table has turned into art central for Kyle's crafts. He will not stop drawing! So this was going to be a perfect solution. I could clean it up and spray paint it to match my decor, then we could all co-exist (and eat!).

First I took all the screws out and cleaned it with a hose, soapy water and a Magic Eraser. If you haven't used these before you are really missing out. They clean anything!!!! The mystery was solved....they were sticks and crayons in the pencil holder. the entire desk cleaned up very nicely and I waited till it all dried out completely.


I really wanted the colors I chose to match our decor and I really didn't want to buy any more spray paint. Then I realized I had to do turquoise and brown, so off to Home Depot we went. I swear by Rustoleum and I used Lagoon and Espresso in Satin. The key to spray painting plastic is to apply the spray paint evenly from 12 inches away and let it dry completely.


As if I didn't have enough luck, I took the desk light and removed the batteries to see if it would work. You guessed it!!! It really is the little things!

I was going to spray paint the wipe board with chalkboard spray paint then decided to leave well enough alone. The wipe board cleaned up nicely and will last longer than the chalkboard paint.


My guy is so excited and he has not stopped creating. Best of all he loves all the little compartments so he keeps all his art supplies in his desk now and off the kitchen table!!!!
Before
After
 For under $15, I am super ecstatic with the results and more importantly -- so is Kyle!

~ Jenn